
New Red Diamond Series Part 2
--clear night filter and more
Offer: Kai Hornung
Polarizer
A polarizing filter is a basic filter you should include in your arsenal. What it does is reducing glare, for example on the water surface (which is very good at revealing the bottom of clear lakes, like shown in the example), on glass or even on leaves in the forest. It also provides contrast and boosts color saturation, for example in the sky. The polarizer is a circular filter. And it needs some care: because like all regular pol-filters just half of the filter is coated so that it provides the desired effect. That is why you have to make sure in which direction you have the circular filter turned. When shooting a lake and you would like to reduce the reflection on the water surface turn the polarizer into the desired direction. Sometimes the effect can be a bit difficult to see on your camera screen. That´s why you should either mark the outside ring of your filter or simply remember in which position the manufacturer print is placed on the outside. I know that “Haida” is printed right where the polarizer works at its strongest. This means when photographing the aforementioned lake I made sure that the ‘Haida’ print pointed straight down (6 o.clock). …just don’t forget to turn the filter when you flip from horizontal images into vertical. I could slap me in the head every time I forget to turn the filter and have the polarizing effect on the wrong part of the image.
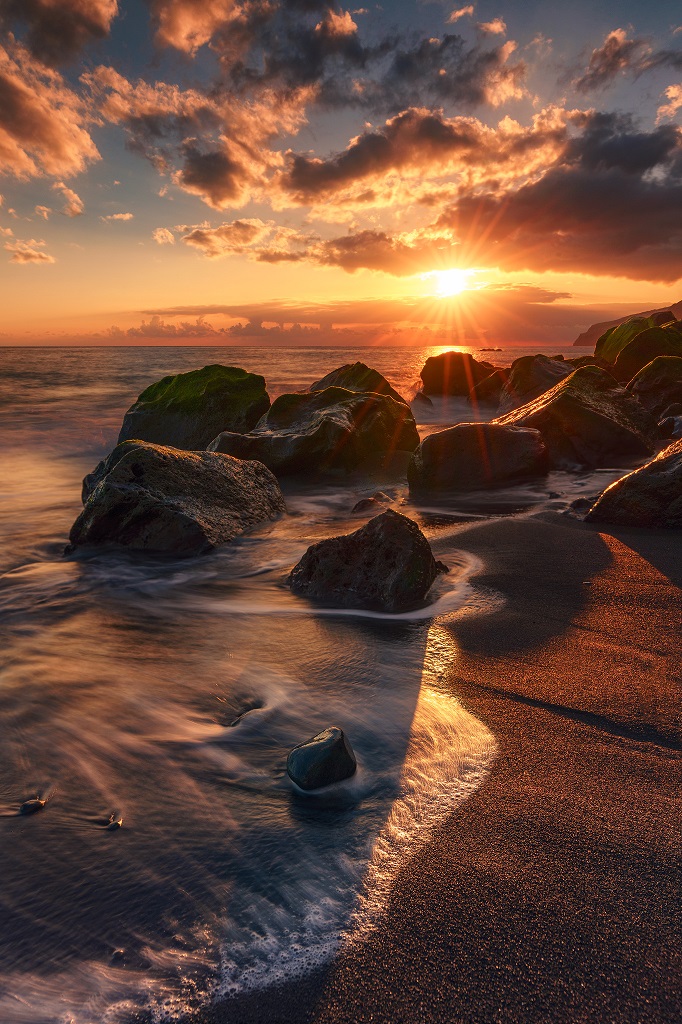
sunset at Madeira. A 6 Stop ND-Filter was used to achieve the streaks in the receding waves. And and a 0.9 graduated ND filter was used to capture more of the high dynamics by darkening the bright sky.
Flares (the workaround)
What I don´t like is flares. Depending on the angle of incoming direct sunlight you have a chance of getting flares or reflections on your images. From what I heard this is a general problem with filters. A physician will be able to properly describe reasons for those reflections. I understand it as light that bounces of the different layers of glass (lens and filters) and might result into a reflection if the light falls in in certain angles. I read about matteboxes being available to shield your camera and filters from those incoming sunbeams. But I haven´t tried those, nor do I know anybody using them. After I had discovered a couple of images with those reflections on them, it raised an awareness how to work in the field. Whenever there is direct sunlight on the front of the camera or on the sides I try to take extra care while using a filter. I won´t sacrifice a composition but I double check test shots and then shield the camera with a cap or anything I have with me. Might look funny to some when I stand behind the camera with arm outstretched holding a hat in a way that its shadow lies on the camera (shielding it like you may do with your hand above your eyes on a bright summer day). It´s a workaround yes. But it comes without any cost and is easy to do. …something you start noticing and doing when you get more experienced photographing in different conditions. And it is something that makes an image be an image and not just a snapshot.
The Haida clear night filter
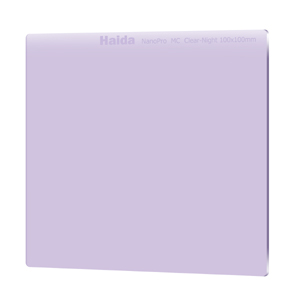
official product image of the Haida clear night filter.
I asked a couple of photographers: "do you think those clear night filters are of any use for photographers who edit their images and photograph in raw format?". The answer was "not really" most of the time. But I wanted to find out myself. So I tested the Haida NanoPro MC Clear-Night Filter 100x100mm. When it arrived I was surprised about its appearance. The pinkish look of the glass lookes rather odd and a bit funny to me. So I was curious what color cast it may produce.
I tried the clear night filter for a couple of night images in difficult conditions: inside the town of Amsterdam, where artificial light lit up the place and made the faint clouds in the sky look rather murky and ugly. Well just the way clouds look at nights in the city. Look at this comparison of 2 images I photographed with my Sony a7riii and identical settings of 18 mm, f6.3, 30 sec., ISO 100 (a pre-edited raw-file inside Lightroom):
with Haida clear night filter
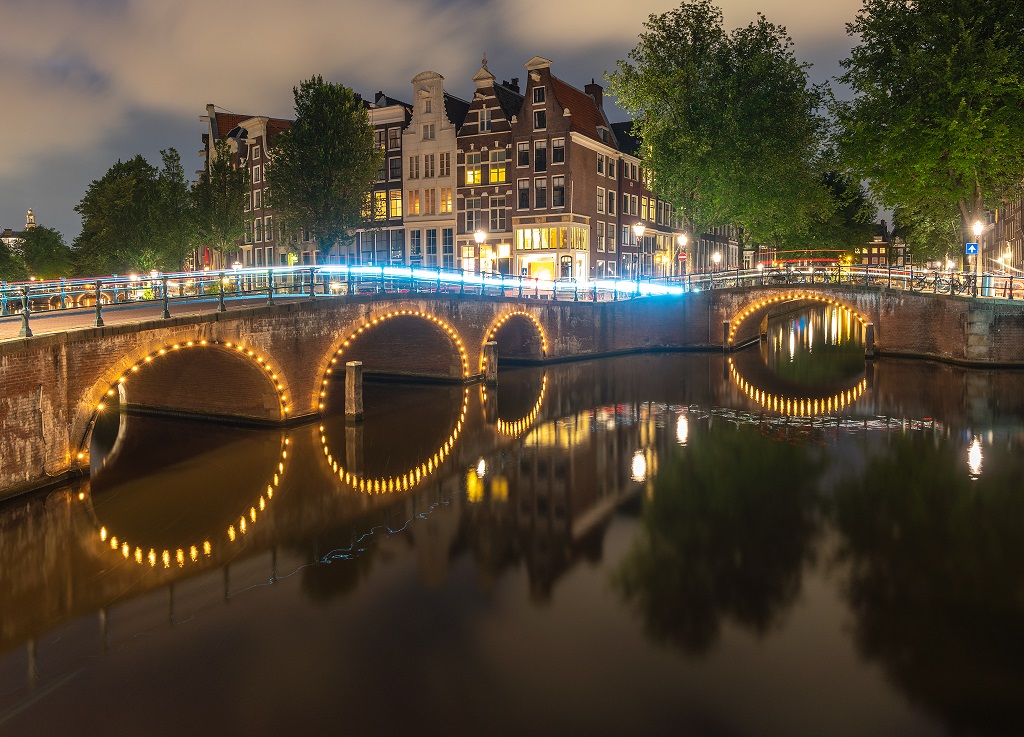
without Haida clear night filter
To my surprise the difference of the results is way stronger than I had imagined. Both images have gotten the same minor raw-file edit with the white balance left untouched. As you can see the colors with the use of the clear night filter look more vivid and pleasing. Most obvious in the night sky where the light pollution does not make the image look dirty anymore. I also think that the image looks more brilliant and - as the name says - clear. Yes, the filter does take out some light (I would say about half a stop). And this is a concern for me. Especially when thinking of photographing stars or the milky way. In those situations I fight for every visible star and I don’t really see me using the filter there (need to point out though: I haven’t tested it in those natural conditions, yet). But when shooting cityscapes during nighttime this filter truly shines. Yes, you can achieve those results inside your post processing. But it takes time. And I often find myself struggling to find the perfect temperature and color balance inside those kind of images. The Haida clear night filter truly helps there and is indeed a useful addition. And I can imagine it is even more so for people who don’t like to edit their images much.
Red-diamond series (haida´s newest filters)

I had the new Haida red-diamond filter with me at the iconic Drei Zinnen / Tre Cime in the Italian Dolomites (a bts image shot with my iPhone)
So now to the newest gear from Haida: They just released their brand new high quality filter series called red-diamond. The glass of the filter is even more durable (shockproof as stated) and is more likely to survive those scary moments when you accidentally drop your precious filter in the midst of the action (and I have seen this happen multiple times to other photographers and even managed to break one of my previous filters myself). And this to me is a game changer. Because…well, things happen when you have freezing hands and want to change filters fast while the last light of day vanishes. I have seen several videos of people doing a drop test with the new red diamond filters (with the filter not breaking. But in all honesty I just could not convince myself trying to this, too, risking valuable gear. Call me chicken here….The filter is scratch resistant, too, which is also good news for the pro´s who don´t like to worry about gear in the field and just use it without being overly protective. And trust me, there is plenty of stuff that can ding against your filter glass: little hooks on gloves, straps on the camera, some gear you still hold in your hand while fiddling with the filter system. If you have ever worked in the field hastily you know what I mean. I have used my Haida red diamond ND 1.8 filter during my recent Dolomite tour: not a single scratch on the filter. Simply flawless.
Further improved is anti-color cast. In all honesty I hardly noticed any in the NanoPro MC Series. But oh well, to have 0 % color cast instead of maybe 3% is an improvement. But this one I leave up to the guys testing in labs. I haven’t noticed any color cast issues. So overall congratulations on having produced this great high quality filter.
To be Continued...
Related news
- New red diamond series, clear night filter and more - part 2
- Tips of Choosing Suitable Filters
- M15 Filter Holder Haida
- Product Review: Haida Filters
- Haida Filters in Depth Review
- First Experience with Insert Filter